

As implants have become a more prominent treatment modality in our dental practices, the clinician needs to have a clear understanding that proper positioning of the dental implant is critical in achieving smile design and emergence profile. Long term function is dictated by the ideal surgical placement of the fixture. Although our patients only see the final restoration, it is the underlying implant position that is most important. It is the foundation to a healthy, functional and esthetic prosthesis.
How is this achieved? Taking a “tooth-up, or tooth-down” approach will insure the best prognosis. This means visualizing the final crown prior to surgical intervention. Placing an implant is not that complicated with our modern technologies, but depth, mesial-distal and facial-lingual/palatal positions need to be precisely controlled.

Figure 1 
Figure 2 
Figure 3 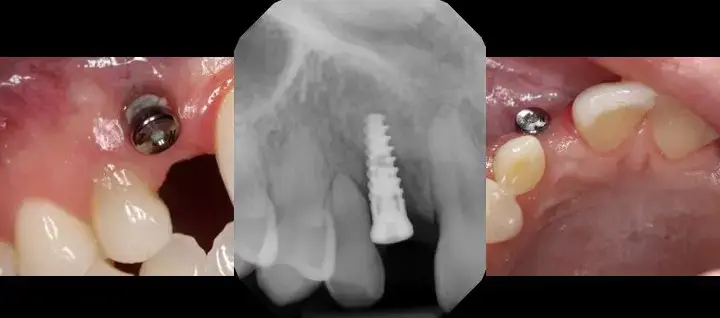
Figure 4 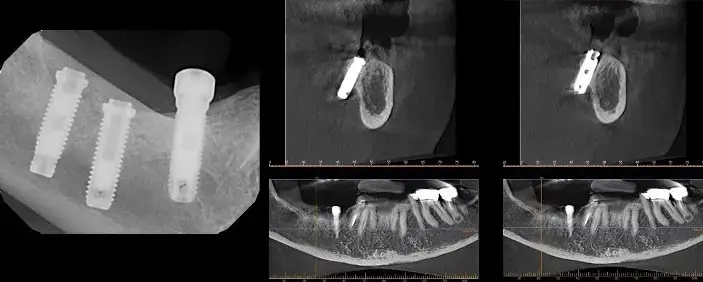
Figure 5

Figures 1,2,3,4 and 5 illustrate improper positioning of dental implants which compromise the esthetic result. Placing implants ideally is a bit more complicated than just drilling a hole in the bone and threading it into place. Understanding vital anatomy, including the nerve position, sinus size, undercuts and concavities is imperative. Carefully evaluating available width and height of hard tissue and the interocclusal space available for our restoration can predictably provide a positive long term prognosis. Interocclusal distance should be measured prior to any surgical intervention. An abutment for a cement on crown must have a minimal height of 5.0mm for retention. Less than 5.0mm of interocclusal space may result in crown dislodgement. In these circumstances a screw retained crown is most effective. Finally, and equally important, the clinician must be aware of the mucogingival line which is clearly delineated. This line is created when attached gingiva meets mucosal tissue. As teeth are loss in the mandible, bone normally shrinks down and in. The mucosal tissue often follows this bone loss and will rest of the facial aspect of where our implant needs to be positioned. There must be a band of at least 2mm of attached gingiva on the facial aspect of all dental implants.
Problems in implant placement can be eliminated by following simple protocols illustrated here. Although our dental laboratories can often compensate for improper angulations, the results are often expensive and esthetically challenged. It is always better to visualize the final result prior to any placement.
Placement of the implant must be made ideal when considering a screw retained implant crown. This means centering the implant in the center of an edentulous ridge in the posterior maxilla and mandible. One must consider both the mesial-distal and facial-lingual angulation of the implant to create emergence profile that is both functional and esthetic. The access screw hole is positioned in the occlusal surface of posterior teeth and on the lingual or palatal cingulum area of anterior teeth.
So how do we achieve this ideal placement of our dental implants? CBCT analysis and virtual design can help us visualize the case finished prior to any surgical placement. We can determine if there is adequate height and width of available hard tissue. If there are discrepancies in the available bone, techniques for bone growth can be done. Our cases need to be ideal, or the patient must be made aware of the potential complications upon restoration.
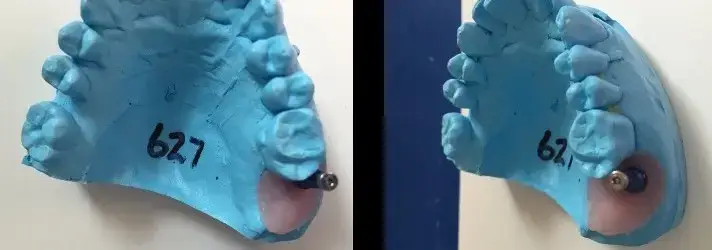
In our case presentation, Figure 6 illustrates an edentulous space in our patient’s mandibular first molar area. There appears to be adequate interocclusal space and bone width. A radiograph helps determine the amount of viable vertical bone. Treatment options for restoration include a conventional three-unit fixed bridge, a removable appliance or leaving the space alone.
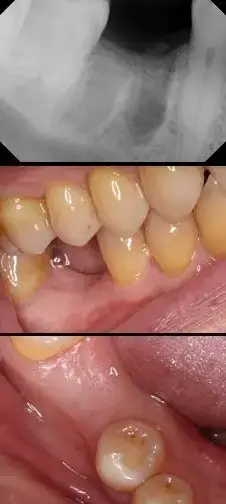
Figure 6 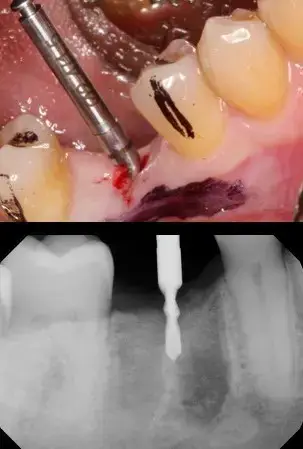
Figure 7 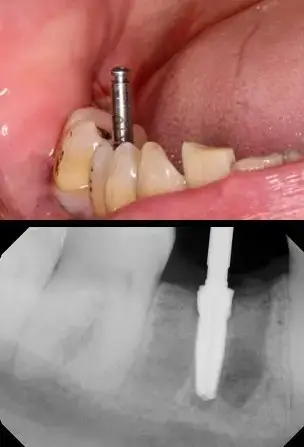
Figure 8
As patients are becoming aware of the advantages of implant dentistry, they often present to our practices requesting this mode of therapy. As mentioned CBCT analysis could help us create a surgical guide to help in positioning the dental implant. However, a free-hand approach can be accomplished and still achieve an outstanding clinical end result.
A tissue punch is used to remove the tissue over the proposed implant site, in a flapless surgical procedure. This eliminates the possibility of soft tissue being pushed into our osteotomy site which could result in improper implant integration and failure. The most important bur in any dental implant surgical kit is the pilot bure. Here a 2.4mm diameter bur with clear markings is used with the Hahn dental implant system provided by Glidewell Dental Lab. The bur penetrates the hard tissue to a very conservative 4mm or so. A digital radiograph is made to precisely determine the mesial-distal angulation. (Figure 7) The black spaces on either side of the bur shows that we should have nice emergence of the final implant retained crown. Standing up and visualizing the bur will help in the facial-lingual angulation. (Figure 8)
We now have the ability to position our dental implant in the best possible position. Next, we need to determine the depth of implant. Using the apicies of the adjacent roots is an excellent method to prevent potential trauma to the mandibular nerve. Osteotomy burs create the site for our dental implant. In the Hahn implant system, the osteotomy bur lengths are 8, 10,11.5,13 and 14mm. Widths of the implants are 3.0, 3.5, 4.3, 5.0 and 7.0mm. Once angulation and depth are determined, the osteotomy site is simply widened using first the 3.5mm diameter bur, the 4.3mm diameter bur and finally the 5.0 diameter bur. Note that a radiograph is taken at each step to insure proper position.
Because the osteotomy preparation is slightly smaller than the implant itself, and since the Hahn implant system has an aggressive thread design, the implant gains excellent stability and torque. Here the implant is positioned at the crest of the ridge and torqued to 45Ncm. Because we achieve a torque above 25Ncm, a taller healing abutment is placed into the body of the implant. This taller healing abutment eliminates the need for future uncovering and anesthesia of the implant and provides for tissue healing around the abutment. (Figure 9) The surgery is relatively non- invasive with little or no bleeding. The patients rarely exhibit excessive discomfort. Post -operative directions include ice to the outside of the face to minimize any swelling and 600 mg ibuprofen as needed. Since there is no infection to the site, an antibiotic regimen is not required.
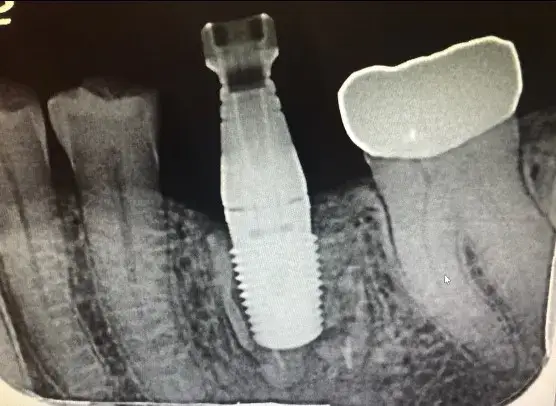
Figure 9 also shows the tissue healing around the implant following 3 months of integration. A nice tissue cuff is created, providing excellent periodontal health. An impression is made of the implant body using an impression coping with polyvinylsiloxane material or the implant can be digitally scanned using a scan body specific to the Hahn implant system.. The dental laboratory CAD/CAM designs and mills the screw retained implant crown for the mandibular first molar. The abutment screw is torqued to 35Ncm with this system. The access hole is covered with a composite restoration and the final digital radiograph of the implant crown in place is made to insure a complete seat. (Figure 10)
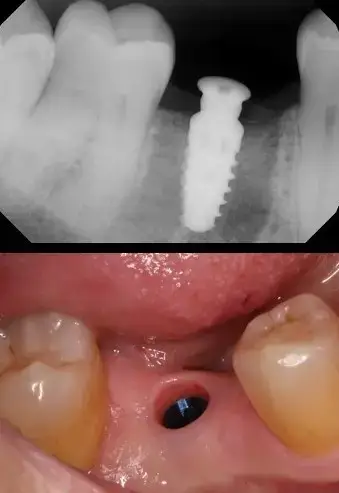
Figure 9 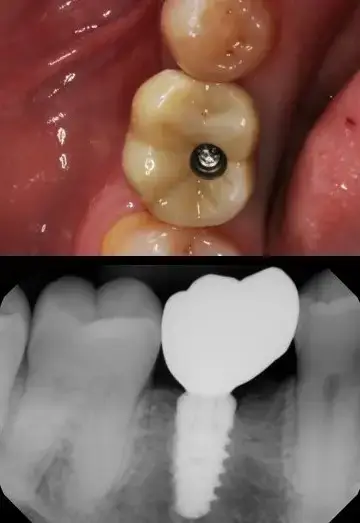
Figure 10
Preparation for the surgery of dental implants should be predicted by an understanding of the final prosthetic reconstruction. Visualizing the case finished before, along with any needed surgical intervention, is important if we keep in mind that dental implants are prosthetically driven. Mounted diagnostic casts are helpful to determine interocclusal dimensions. Discussions about the final esthetic requirements and patient expectations should be addressed. With the use of our modern zirconia materials we are able to deliver esthetic and strong restorations in the posterior arch. With proper education and clinical training and with the help of a skilled laboratory team, we are able to predictably provide our patients with the best dental implant design, function and esthetics.
