
Co-Authored by Drs. Tim Kosinski and Stephanie Tilley
Dental implants have become a preferred treatment option for patients seeking long-term solutions for missing teeth. Successful dental implant placement requires careful planning, surgical skill, and the use of modern technology.
Here’s a step-by-step guide to ensure efficient and effective dental implant procedures.
The images included throughout are a clinical case demonstration of the atraumatic extraction on a non-restorable mandibular first molar and grafting in preparation for a dental implant placement and restoration:
1. Pre-Implant Extraction and Socket Grafting
If a tooth is non-restorable, extraction is the first step. After extraction, the integrity of the bony socket walls is evaluated. If all walls are intact, socket grafting becomes a routine procedure. The Osteogen plug (Impladent) is a cost-effective and predictable material for bone grafting. Following thorough curettage of the socket to remove granulation tissue, the graft material is condensed into place. This promotes bone regeneration, allowing for quicker integration. Complete closure of the tissue isn’t necessary since the epithelium will naturally grow over the socket at a rate of 0.5–1mm per day.
Image Details:
Our patient is a 66 -year male with no significant contraindications to surgical extraction. The long- standing root canal treated mandibular first molar became symptomatic with discomfort on mastication and swelling. A horizontal fracture was suspected. Treatment options were discussed after deciding that the best course of treatment was extraction and grafting of the sockets. These included; no treatment, a conventional three-unit bridge or a single dental implant.


Prior to extraction of the mandibular roots the porcelain fused to metal crown would be removed. This was completed by taking a metal cutting bur in a high-speed electric handpiece and making an elliptical window in the facial aspect in the occlusal third. The preparation extended to the central groove area.


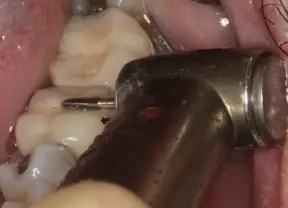
A Wam Key (Golden-Dent) is a series of three high-quality stainless-steel instruments with an elliptical ball at the end. The correct tool is inserted into the preparation and with a simple twist of the wrist, the crown is removed.


To simplify the extraction process, the roots are completely separated in the furcation with a 557 surgical bur. The mesial and distal roots can then be removed as if single rooted bicuspid teeth.


A digital radiograph is taken to ensure complete separation through the furcation and a separator instrument evaluates slight mobility.


The Physics forceps (Golden-Dent) is a series of four instruments (maxillary, right, left and anterior and a mandibular universal). The Physics forceps consists of two components; the beak or shovel shaped edge is the working end of the instrument and is engaged 1-3mm subgingival on the lingual root structure. A purchase point is achieved. The bumper, with the green silicone cover, is positioned as far down the vestibule as possible. This component acts as a center of rotation for this modified Class 1 lever. It is not the working end of the instrument and is not used to hold the facial plate. It is simply a fulcrum which allows the beak to create tension of the lingual aspect of the root, creating energy and a physiologic release of an enzyme to break down the periodontal ligaments. The PDL is what is holding the roots in place and once displaced the root will rotate up and out of the socket following the arch of this specially designed instrument. There is no squeezing of the forceps, rather constant rotation of the wrist towards the left shoulder results is removal of the tooth without discomfort to the patient. This atraumatic, or minimally traumatic, technique allows for simple removal of teeth in a matter of seconds without the use of a myriad of tools. Also, because minimal pressure is placed the roots are removed in total. Apical root fracture does not occur.


A post extraction digital radiograph is always taken to ensure that no root fragments remain.
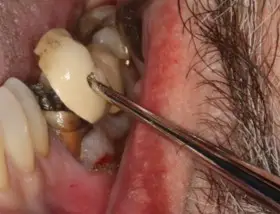
The grafting material used here is the Osteogen plug (Impladent) This Calcium Apatite in a bovine Achilles tendon matrix is a predictable, efficient and cost-effective material to allow for integration of bone structure over time. The material is cut in half and condensed into the sockets firmly with a packing instrument to the crest, or slightly above the crest.


The material is white in color. A post -operative radiograph illustrates the initial radiolucency of the material. Vicryl (PGA) sutures are placed to maintain the material in the sockets. The patient is instructed to not use a straw and no heavy spitting, stay away from crunchy snacks like chips or nacho chips, to use ice to the outside of the face that day to minimize any post extraction swelling. The patient is given prescriptions for 9 tablets of amoxicillin 500mg, 1 tablet three times a day for 3 days and 600mg ibuprofen PRN discomfort. Sutures are removed in 7 days and the site evaluated.
It is imperative that a band of attached gingiva be created on the facial aspect of the implant site. This will be evaluated following integration of the graft prior to dental implant placement.


2. Bone Turnover and Radiographic Evaluation
Digital radiographs offer a two-dimensional image that helps identify diseased teeth, bone loss, and a preliminary view of available bone for implant placement. However, for a more accurate assessment, Cone Beam Computed Tomography (CBCT) scans are crucial. These scans provide three-dimensional images of axial, sagittal, and coronal planes, allowing the clinician to assess vital anatomy and bone availability. This detailed imagery is essential for precise treatment planning, especially in identifying potential complications or limitations in the surgical area. After approximately three months, a follow-up radiograph is performed to assess bone turnover. The apical third of the socket will show new bone formation, indicating the area is ready for implant placement. Although full bone turnover can take longer, the stability of the implant comes from the apical 2mm, allowing for initial placement and integration.
Image Details:
In approximately 3 months, the graft will exhibit more radiopacity. Physiologically, the graft will integrate from the apex towards the crest, so more opacity will be radiographically seen in the apical third of the site. Initial implant stability occurs at the apical 2 mm, so after this short healing time, there is confidence that an implant can be placed and allowed to integrate properly.
The CBCT analysis (Vatech America) in the sagittal view illustrates a site ready for implant placement. Diagnosis is completed by measuring the available hard tissue. Virtual placement and restoration can also be completed prior to any surgical intervention.

3. Implant Placement: Surgical Techniques
A facial envelope-designed reflection is made to expose the grafted site without making vertical incisions, which helps minimize inflammation. Proper implant positioning is critical to success, particularly in the facial bone, where implants often fail due to poor placement. A CBCT scan post-graft integration provides a clear view of bone morphology, guiding the size and length of the implant.
In the posterior mandible, clinicians must account for the location of the mandibular nerve. Ideal implant placement minimizes the risk of nerve injury. Once tissue reflection is complete, the pilot bur is used to create the initial osteotomy. Proper angulation of the implant in the mesial-distal and facial-lingual planes is visually verified. Placement should align with the central groove of adjacent teeth to avoid complications.
The undersized osteotomy ensures initial implant stability by creating a tight fit. Wider osteotomy burs are then used to prepare the site for the final implant, typically 0.5mm wider than the prepared site. Achieving at least 25Ncm of torque ensures the implant’s stability. If initial torque exceeds this threshold (in this case, 45Ncm), a one-stage surgical procedure can be performed. A healing abutment is placed and torqued to 25Ncm, eliminating the need for a second surgery.
If the implant’s torque is less than 25Ncm, or if the patient has additional risk factors (e.g., smoking), a cover screw is used, and a second-stage surgery will be necessary after the healing period.
Video demo of the implant placement:
4. Final Prosthetic Phase: Crown Placement
After implant integration, the healing abutment is removed, and an implant-level impression is taken. This can be done using digital scanning or traditional impression techniques. The data is sent to a dental laboratory, where a custom screw-retained zirconia crown is fabricated using CAD/CAM technology. Once the crown is placed, the abutment screw is torqued to 35Ncm, and the access hole is sealed with Teflon tape or a cotton pellet before placing the final composite restoration.
3-Months Post-Op
Image Details:
After three months of integration, the healing abutment is removed, a scanning pin placed, and a digital impression made.
A screw retained zirconia (Bruxzir, Glidwell Lab, Irvine,CA) is torqued to 35Ncm and the access hole covered with a piece of tephlon tape and composite. The patient is now in function.


5. Post-Operative Assessment and Long-Term Prognosis
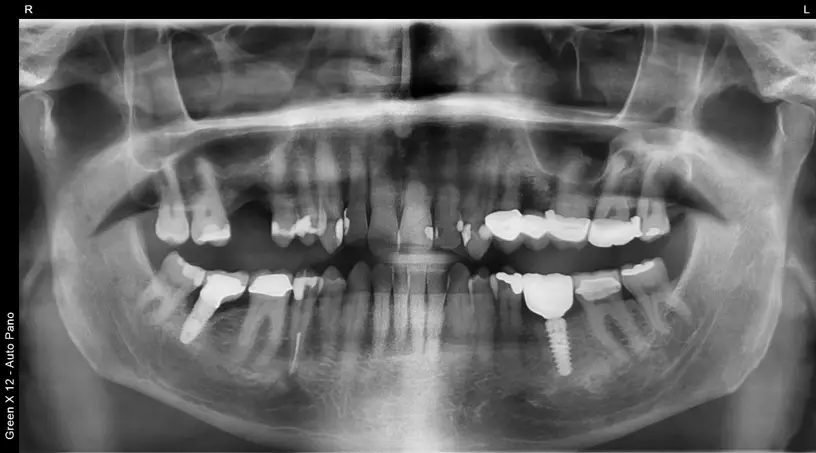
Post-operative digital periapical and panoramic radiographs illustrate the final implant retained restoration. Post-operative CBCT analysis is performed to confirm the final positioning of the implant. The radiographs should match the pre-operative planning, ensuring optimal placement and integration. With proper planning, skillful execution, and the right technology, dental implants provide patients with excellent functional and aesthetic results. Meeting patient expectations while delivering long-term solutions makes dental implants a valuable option in a clinician’s treatment armamentarium.

Above Image Details:
Digital radiographs provide a two-dimensional image of diseased teeth, bone loss and provide a curtailed view of available hard tissue appropriate for surgical placement of a dental implant. CBCT scan analysis (Vatech America) will show the axial, sagittal and coronal planes. These 3-dimensional images are valuable in determining precise vital anatomy and vertical and horizontal bone availability prior to any surgical intervention. Diagnosis of issues surrounding symptomatic teeth can be better accomplished and a proper plan established. Treatment options are communicated to the patient using the visual images provided by this technology. Following extraction of the non-treatable mandibular molar tooth, the socket site is evaluated for boney walls. When all walls are intact, grafting procedures become relatively routine. The use of the Osteogen plug (Impladent) is a predictable and cost effect material that provides for integration of bone over a short period of time. Following curetting of the socket, eliminating all granulation tissue and creating a site with adequate bleeding, the material is simply condensed firmly to or slightly above the adjacent ridge crests. Vicryl sutures (Newport Biologic) are used to reposition the attached gingiva. The Calcium Apatite graft does not require a membrane. Complete closure of the tissue is also not needed as the epithelium will grow over the socket at a rate of 0.5-1mm per day. The epithelium has two options: to grow into the graft, as it would with a more conventional allograft material of various size and shape (250-1000 microns) or follow a path of least resistance and grow over the top. Nature will follow the path of least resistance. Allografts require a membrane of some design to prevent invagination of epithelium into the socket size potentially affecting proper bone turnover. Physiologically, integration and replacement of the alloplastic material with natural bone occurs from the apex toward the crest. Although an immediate post-operative radiograph will show radiolucency of the material in the socket, over a few months bone turnover will occur, and one can objectively see radiopacity occurring. Being able to visualize bone turnover with a radiograph is very useful to determine when a dental implant placement can be considered.
After approximately 3month, a new radiograph is made illustrating bone turnover in the apical one-third of the socket adequate for in implant to be surgically placed with appropriate initial torque. Bone turnover will continue over time, but initial stability of any tapered implant occurs in apical 2mm. The undersized osteotomy, used to create space during site preparation for the implant, simply removes bone but allows for immovability and integration of the implant during the additional 3 months healing period. Here a Glidewell HT dental implant is placed. A facial envelope designed reflection is made to visualize the newly formed boney site. No vertical incisions are made to eliminate prostaglandin and histamine release which occurs when mucosal tissue is incised. I prefer to stay keep any reflection incisions in attached gingiva to best evaluate the facial bone. Most implants fail due to improper positioning too far facially, which prevents proper integration. A CBCT analysis post-graft integration provides the opportunity to evaluate bone morphology, providing information on the length and width of implant to be engaged prior to any surgical intervention. The concern in the posterior mandible is the locus of the mandibular nerve, which is determined radiographically by the mandibular canal. Ideal placement is determined to reduce the anxiety of implant placement in this area. Once the tissue is reflected facially, the steps for implant placement is completed. The pilot bur is used to angle the implant ideally both mesial-distal and facial-lingual. The clinician should evaluate the facial-lingual angulation visually. Ideally the placement should be along the central groove area of the adjacent teeth. Digital radiographs are a simple way to visualize angulation and depth. Using the apices of the adjacent teeth roots is a good safety method to eliminate concerns with damage to the nerve by preparing too deeply. Do not penetrate longer than those apices. Once mesial-distal, facial-lingual and depth are determined, wider osteotomy burs are used to complete the process. These burs are not ending cutting, rather, easily widen the site quickly and efficiently. The implant chosen are actually 0.5mm wider than the prepared site, which provides for great initial stability. If 25Ncm or more of torque is achieved (here 45Ncm of torque was achieved in this previously grafted socket), a one stage surgical procedure is done and a 3mm tall healing abutment is then torqued to 25Ncm. Two Vicryl sutures are used to reposition the tissue. This one stage surgical protocol eliminates the need for anesthesia and uncovering following the three-month integration time frame. If there are functional concerns, if initial torque is less than 25Ncm or the patient is a smoker, cover screws are used to bury the implant. Tissue will overgrow that site requiring a secondary exposure after implant healing. Once integration is completed, the healing abutment is removed, and an implant level impression is made either by digital scanning or using conventional analogue impression techniques. The information is provided to the dental laboratory (Glidewell Lab, Newport Beach,CA) and a screw retained Bruxzir zirconia implant crown is made using CAD/CAM technology and milling. The crown is situated, and the abutment screw torqued to 35Ncm.
The access hole is the covered with a Teflon tape or cotton pellet and the appropriate composite restoration is made. Final radiographs illustrate a complete seating of the platform switched abutment/crown. Post-operative CBCT analysis illustrates final positioning of the implant in the previously grafted extraction site which is identical to the pre-operative diagnosis and planning. With proper training, proficiency and efficiency is achieved providing excellent form and function to the patient with an outstanding long-term prognosis. Our patients are frequently requesting this type of treatment, which can be provided to meet their desires and expectations and should be in the clinician’s armamentarium.
Conclusion
Dental implant procedures require meticulous planning and precise execution. With advances in radiographic and CBCT technology, clinicians can accurately diagnose, plan, and perform implant placements with a higher degree of confidence. Offering implant services not only meets patient demand but also provides a reliable and profitable solution for dental practices.

Timothy Kosinski, DDS
Dr. Timothy Kosinski is an Affiliated Adjunct Clinical Professor at the University of Detroit Mercy School of Dentistry and serves on the editorial review board of Reality, the information source for esthetic dentistry and is the past editor of the Michigan Academy of General Dentistry. He is currently the Editor of the AGD journals General Dentistry and AGD Impact, and was named editor of IMPLANTS TODAY, the implant publications of DENTISTRY TODAY. In 2023 Dr. Kosinski was presented the ADA/AAADEJ’s “Distinguished Editor Award.” He is a Past-President of the Michigan Academy of General Dentistry. Dr. Kosinski received his DDS from the University of Detroit Mercy Dental School and his Mastership in Biochemistry from Wayne State University School of Medicine. He is a Diplomate of the American Board of Oral Implantology/Implant Dentistry, the International Congress of Oral Implantologists and the American Society of Osseointegration. He is a Fellow of the American Academy of Implant Dentistry and received his Mastership in the Academy of General Dentistry. Dr. Kosinski has received many honors including Fellowship in the American and International Colleges of Dentists and the Academy of Dentistry International. In 2017 he received the Academy of Dentistry International’s Humanitarian Award “in recognition of significant contributions to the enhancement of the quality of life and the human condition.” He is a member of OKU and the Pierre Fauchard Academy. Dr. Kosinski was the University of Detroit Mercy School of Dentistry Alumni Association’s “Alumnus of the Year,” and in 2009, 2014 and 2020 received the Academy of General Dentistry’s “Lifelong Learning and Service Recognition.” Dr. Kosinski has placed over 19,000 dental implants and published over 240 articles on the surgical and prosthetic phases of implant dentistry, over 60 dental editorials and was a contributor to the textbooks, Principles and Practices of Implant Dentistry, and 2010’s Dental Implantation and Technology.
Dr. Timothy Kosinski can be reached at:
Office: 248 646-8651
E mail: drkosin@aol.com
Website: www.smilecreator.net

Stephanie Tilley, DMD
Dr. Stephanie Tilley is a graduate of the University of Alabama School of Dentistry. She is a native of Pensacola, Fla, and has been practicing dentistry in her hometown since 1998. She keeps up with the latest in dentistry by attending continuing education seminars on topics such as oral surgery, implants, veneers, periodontal disease, cosmetic procedures, and much more. Dr. Tilley has also done extensive training at the Las Vegas Institute for Advanced Dental Studies and the Engel Institute with Drs. Timothy Kosinski and Todd Engel. Her lectures discuss bone grafting procedures and surgical and prosthetic aspects of implant dentistry. She is a Fellow of the International of Dentists and most recently was inducted into the American College of Dentists, the Pierre Fauchard Academy and the Academy of Dentistry International. Dr. Tilley is member of the AGD, the ADA, the Florida Dental Association, the Alabama Dental Association the Academy of Laser Dentistry, and the Academy of American Facial Esthetics. Dr. Tilley is also a Fellow with the International Congress of Oral Implantologists. She has been featured in many national dental publications and has published extensively on implant dentistry techniques, lasers, and Botox/ fillers.
Dr. Tilley can be reached at stephflynntilley@cox.net.
